


Introduction
Propel is an API platform that enables developers to seamlessly integrate high-performance analytics into web and mobile applications. It is an all-in-one approach tool, eliminating the need for extensive data infrastructure and dedicated teams typically required for analytics integration. With Propel's comprehensive suite of tools and features, developers can streamline the process of incorporating analytics capabilities, enabling businesses to make data-driven decisions and deliver exceptional user experiences.
Propel data tool is one of the notable components of propel which is a powerful tool that provides a range of functionalities for managing and optimizing data. Propel Data Tool seamlessly connects with the Snowflake API, which is a leading cloud-based data warehouse solution. By linking Propel Data Tool with the Snowflake API, developers gain access to a scalable and flexible data management system, while Propel serves as the bridge to harness the full potential of Snowflake within their applications. Developers can leverage Propel Data Tool's capabilities to efficiently interact with Snowflake, retrieve data, perform advanced queries, and apply optimizations. This integration enables businesses to unlock valuable insights, build interactive dashboards, generate real-time reports, automate data-driven processes, and deliver data-rich experiences to their users.
Exposing Snowflake data via APIs is crucial for many reasons. Building integrations with other systems, creating dashboards, sharing data, and automation are some of the most common use cases. By exposing Snowflake data via APIs, you can provide a flexible and efficient way for your applications to access and manipulate data.
In this article, you'll learn step-by-step instructions on how to expose their Snowflake data via GraphQL APIs using Propel. We will cover the process of creating a new Propel Data Pool, creating a new Snowflake data source in Propel, and pulling in data from Snowflake.
Prerequisites
Before you get started, you'll need to have:
A Propel account.
A Snowflake account with the SECURITYADMIN, SYSADMIN, and ACCOUNTADMIN system-defined roles.
Exposing Snowflake Data with GraphQL APIs
For the purposes of this tutorial, Imagine you are working for a fictitious e-commerce company, ShopWithUs. ShopWithUs faces the challenge of efficiently exposing their Snowflake data, which is stored in a highly scalable and performant data warehouse. They recognize the need for a robust solution that not only simplifies data retrieval but also provides the flexibility to perform complex queries and transformations on the fly. By exposing Snowflake data through GraphQL APIs with Propel, ShopWithUs aims to unlock the potential of their data and empower their developers to build innovative applications and data-driven experiences.
In this section, we will provide step-by-step instructions on how to expose Snowflake data with GraphQL APIs using Propel.
Create a new Snowflake data source in Propel
To start, you need to establish a connection between Propel and the Snowflake database where ShopThroughUs' data is stored. By creating a new Snowflake data source in Propel, you enable seamless integration and synchronization between the two platforms. This integration allows you to pull in relevant data from Snowflake into your Propel Data Pool, ensuring that your GraphQL APIs have access to the most up-to-date information. By leveraging Propel's ability to connect to Snowflake, you eliminate the need for manual data extraction and enable real-time data retrieval for your GraphQL APIs.
Step 1: Create the Snowflake user, role and warehouse
As the first step, you'll create the Snowflake user, role, and warehouse for Propel. It is recommended to create a dedicated user, role, and warehouse to ensure security and control over the integration.
To do this, follow these instructions:
Open a new Snowflake worksheet
Copy the script provided below and paste it into the worksheet
Select the "All Queries" checkbox to execute all the queries at once.
Before running the script, ensure that you replace the values of the user_password, database_name, and schema_name variables with the appropriate values. Here are the guidelines for each variable:
user_password: Choose a strong password to ensure the security of your Snowflake user.database_name: Replace it with the name of the Snowflake database where your schema is located. Provide the actual name of the database where you want to create the user, role, and warehouse.schema_name: Replace it with the schema name where your tables are located. Specify the actual schema name in the format["database_name"."schema_name"], for example,["WEBTRAFFIC"."PUBLIC"].
Once you have updated these variables with the appropriate values, you can proceed to run the script.
use role accountadmin;
    /* Create variables for user, password, role, warehouse, database, and schema (needs to be uppercase for objects) */
    set role_name = 'PROPELLER';
    set user_name = 'PROPEL_USER';
    set warehouse_name = 'PROPELLING';

    /* Must be at least 8 characters long, contain at least 1 digit, 1 uppercase letter and 1 lowercase letter */
    set user_password = '';             /* Replace with a strong password */
    set database_name = 'WEBTRAFFIC';             /* Replace with your Snowflake database name */
    set schema_name = 'WEBTRAFFIC.PUBLIC';               /* Replace with your Snowflake schema name */

    /* Grant sysadmin role access to the database */
    grant usage,modify
    on database identifier($database_name)
    to role sysadmin;

    /* Grant sysadmin role access to the schema */
    grant usage,modify
    on schema identifier($schema_name)
    to role sysadmin;

    /* Change role to securityadmin for user / role steps */
    use role securityadmin;

    /* Create a role for Propel */
    create role if not exists identifier($role_name);
    grant role identifier($role_name) to role SYSADMIN;

     /* Change role to sysadmin for warehouse and database steps */
    use role sysadmin;

    /* Create a warehouse for Propel */
    create warehouse if not exists identifier($warehouse_name)
    warehouse_size = xsmall
    warehouse_type = standard
    auto_suspend = 60
    auto_resume = true
    initially_suspended = true;

    /* Change role to securityadmin for user / role steps */
    use role securityadmin;

    /* Create a user for Propel */
    create user if not exists identifier($user_name)
    password = $user_password
    default_role = $role_name
    default_warehouse = $warehouse_name;

    grant role identifier($role_name) to user identifier($user_name);

    /* Change role to accountadmin for warehouse and database steps */
    use role accountadmin;

    /* Grant Propel role access to the warehouse */
    grant usage, monitor
    on warehouse identifier($warehouse_name)
    to role identifier($role_name);

    /* Grant Propel role access to the database */
    grant usage, monitor
    on database identifier($database_name)
    to role identifier($role_name);

    /* Grant Propel role access to the schema */
    grant create procedure, create stage, create task, create stream, usage
    on schema identifier($schema_name)
    to role identifier($role_name);

    /* Grant Propel role select on all tables in the schema */
    grant select on all tables
    in schema identifier($schema_name)
    to role identifier($role_name);

    /* Grant Propel role select on all future tables in the schema */
    grant select on future tables
    in schema identifier($schema_name)
    to role identifier($role_name);

    grant execute task on account
    to role identifier($role_name);
Step 2: Create Data Source in Propel
Now that you have created the Snowflake user, role, and warehouse, you can create the Data Source in the Propel by following steps:
- On the left-hand side menu, locate and click on
"Data Sources".
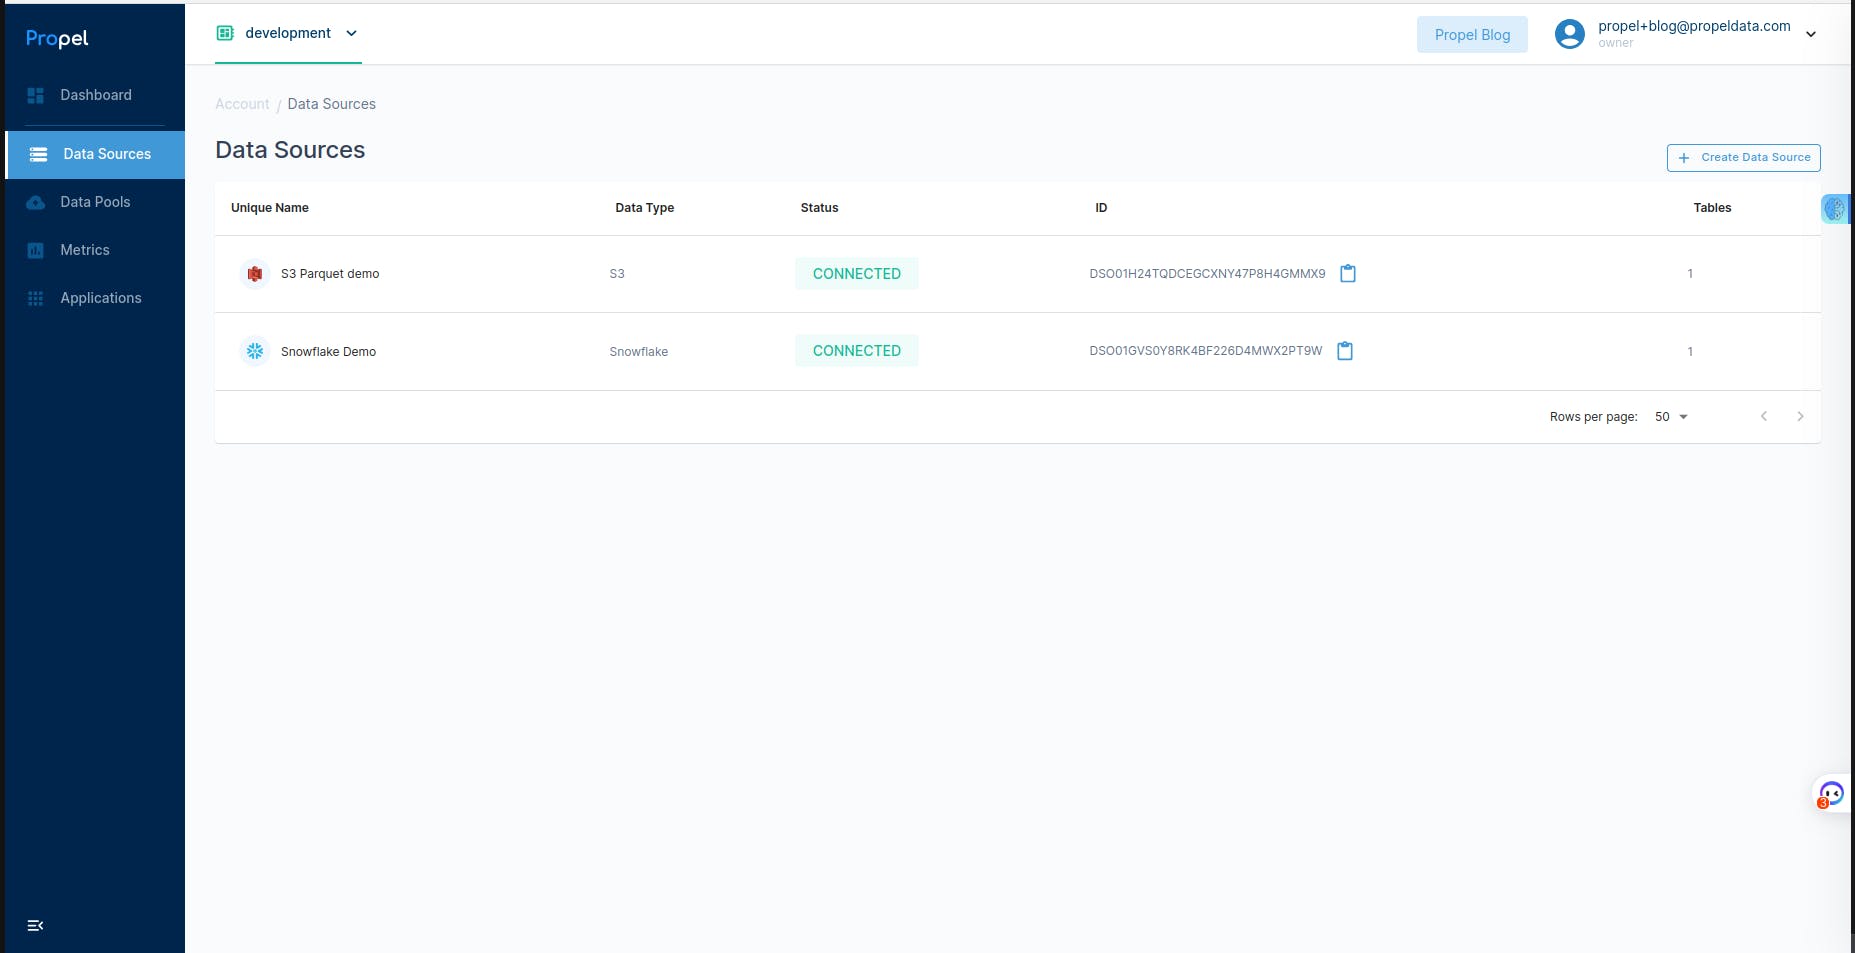
- Click on
"Create Data Source"to initiate the creation of a new data source then select "Snowflake" as the data source type from the available options.

- Provide a unique name and a brief description for your data source then proceed to enter your Snowflake connection details, including the account, database, schema, warehouse, role, username, and password. Ensure that you have the correct and valid credentials to establish the connection.

- Once you have filled in the necessary information, click on the
"Create Data Source"button to finalize the creation of the Snowflake data source in Propel.
You've successfully created Snowflake Data Source in Propel.
Create a new Propel Data Pool
Propel Data Pool serves as a high-speed replicated table, providing a performant and scalable data storage solution. It ensures efficient access to your data, contributing to improved application performance.
Now, you'll create a new Propel Data Pool specifically tailored for storing ShopThroughUs' e-commerce data. By creating a dedicated Data Pool, you ensure optimized data storage and high-speed access, which is crucial for handling large volumes of orders efficiently. This Data Pool serves as a high-performance replicated table, allowing for faster data retrieval and reducing the load on the Snowflake database. By creating a separate Data Pool, you can streamline the data retrieval process and enhance the overall performance of your GraphQL APIs.
While creating the Data Pool, you will need to indicate the table you want to operationalize and its primary timestamp column in the Console.
To create Data Pools from your Snowflake tables, you can follow the following steps:
- While on the Propel Console, click on
"Data Pools", then click on"New Data Pool"button to initiate the creation process.

- Provide a suitable name and description for your data pool then from the available options, select your Snowflake Data Source that you previously configured in Propel.
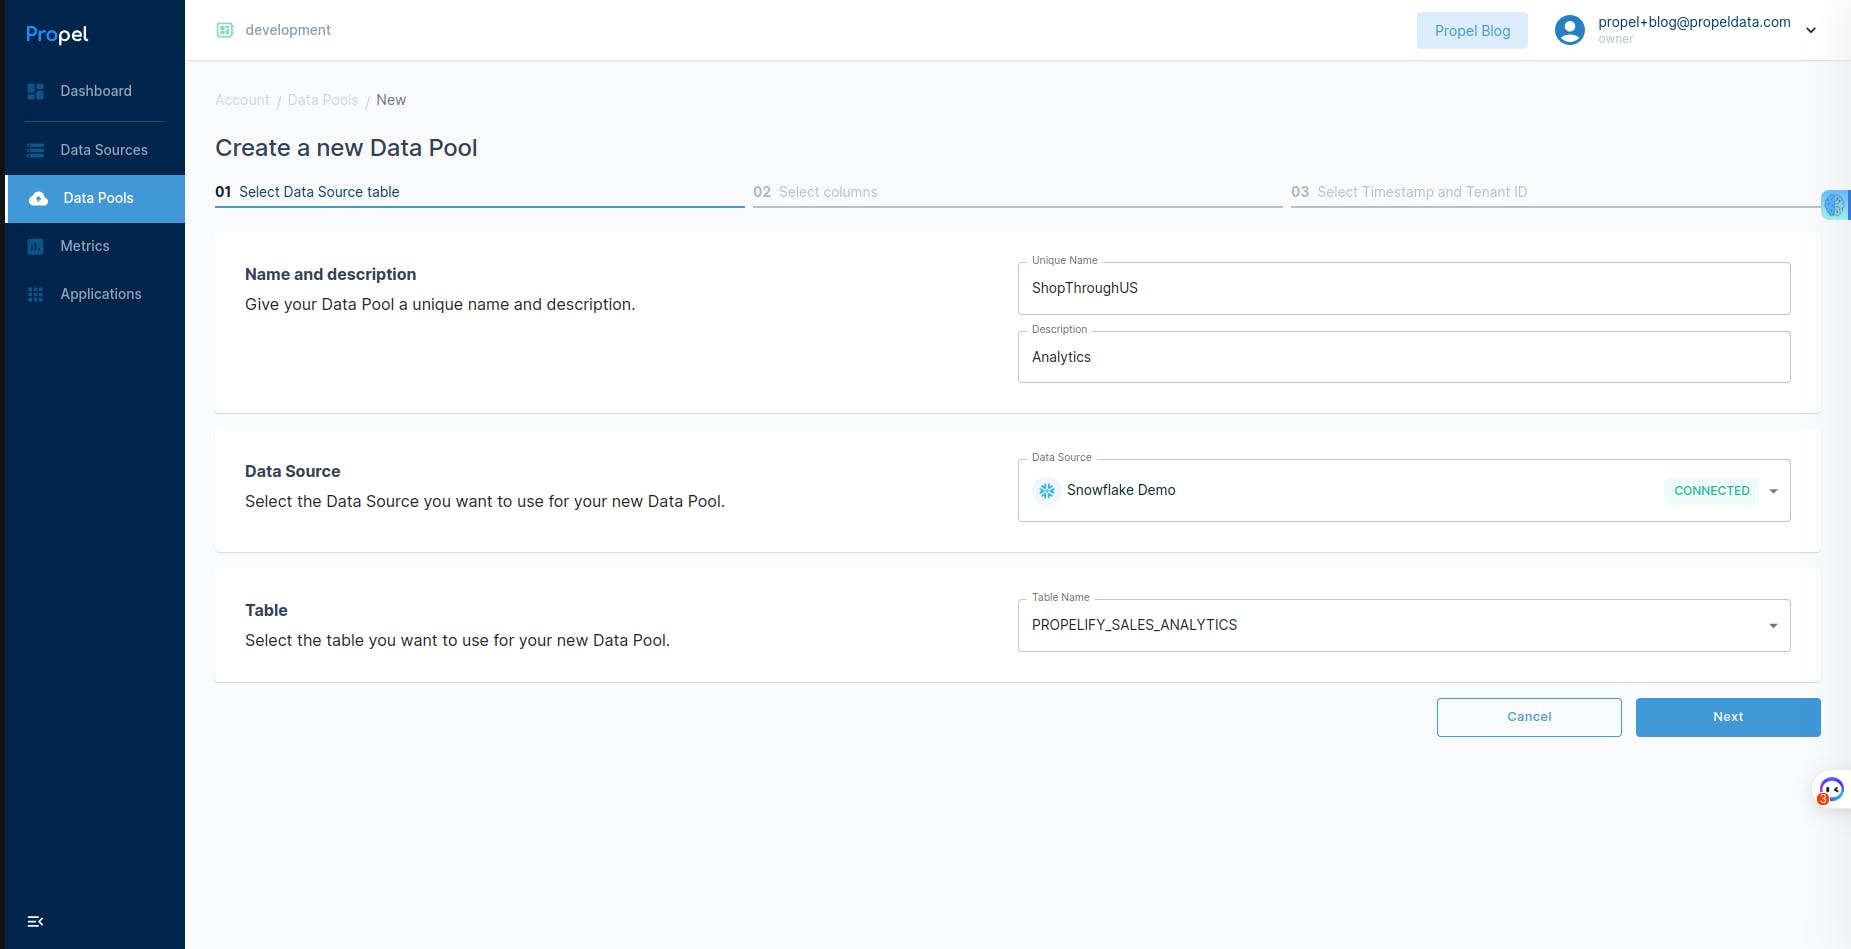
Next, choose the specific Snowflake table that you want to use within your data pool.
Once you have made the necessary selections, click the
"Create"button to create the data pool.
Well done! You've successfully created a new propel data pool.
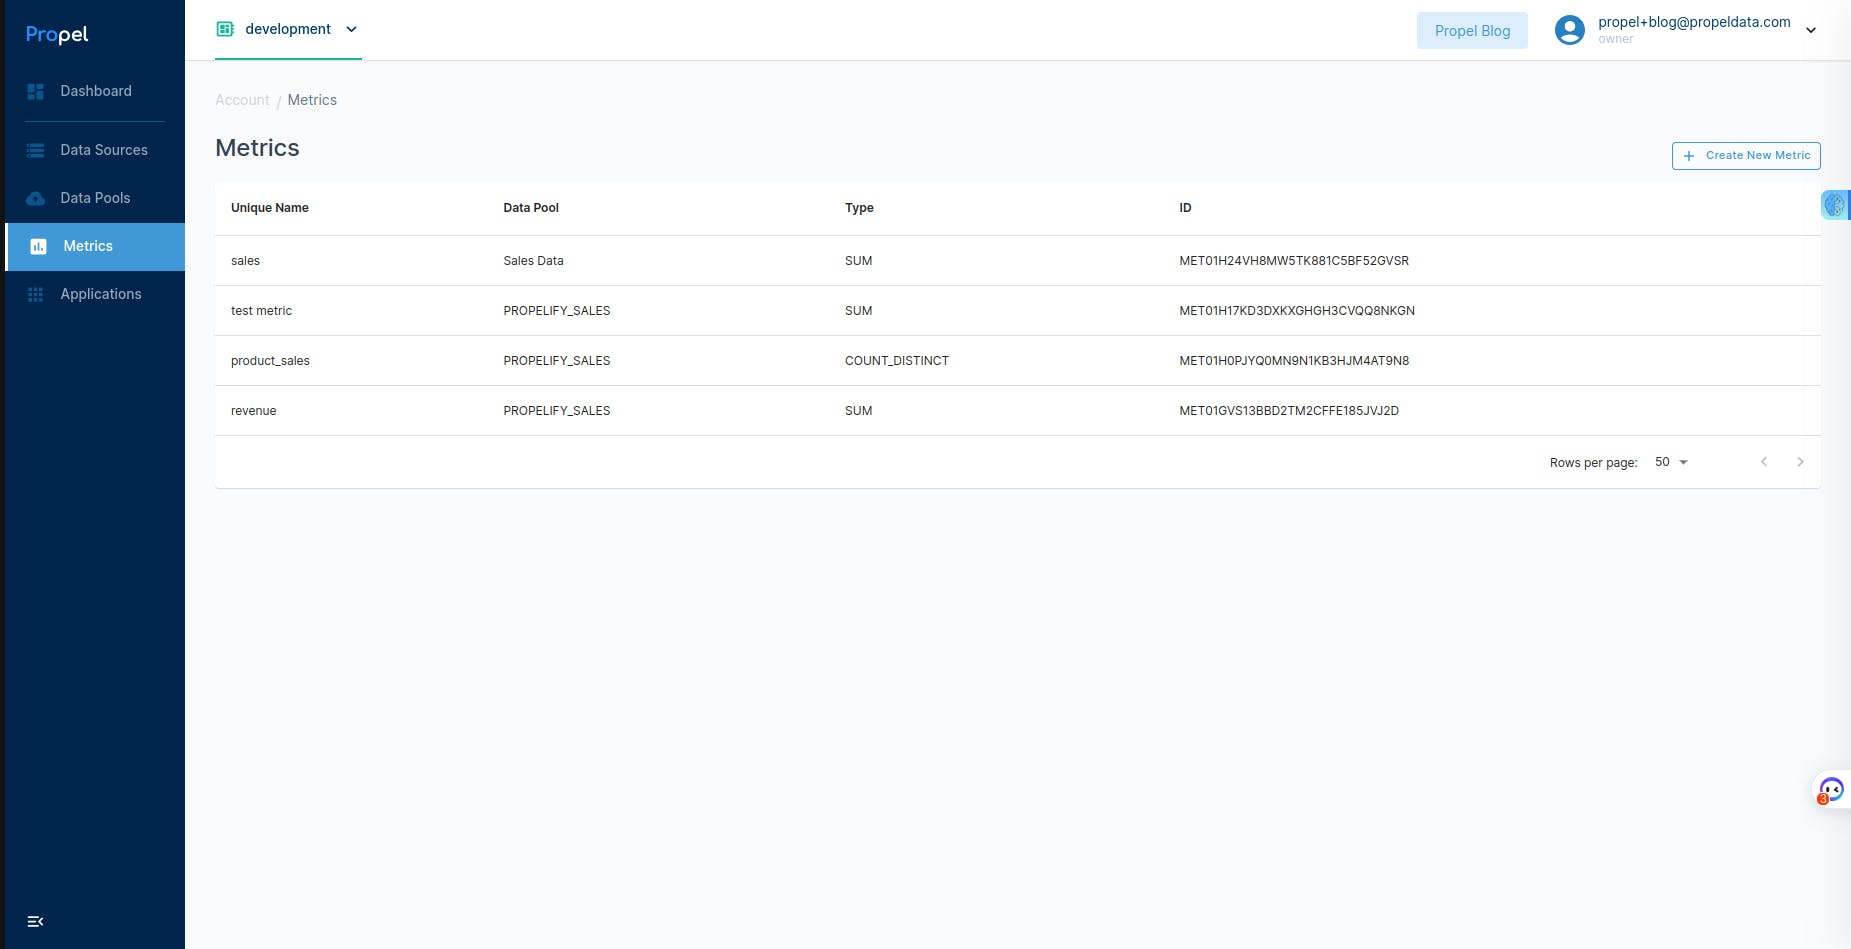
Create Metrics from the data
Metrics play a crucial role in deriving actionable insights from e-commerce data. By creating Metrics in Propel, you can perform aggregations, calculations, and transformations on the Snowflake data. For example, you can create Metrics to track total sales, average order value, or customer retention rate. These Metrics provide a comprehensive view of the business performance and enable data-driven decision-making. By defining Metrics in Propel, you simplify the process of accessing important business metrics within your GraphQL APIs, empowering the development of insightful analytics and reporting capabilities.
Propel supports different types of Metrics, including SUM, COUNT, COUNT_DISTINCT, MIN, MAX, and AVERAGE, allowing you to capture various aspects of your data.
In addition to Metrics, Propel also provides the capability to define Dimensions. Dimensions are the different ways you can filter and analyze your Metric data to uncover valuable insights. When creating customer-facing Metrics, you have control over which columns are exposed as Dimensions to the public. This allows you to provide a customizable and interactive experience for users, enabling them to explore and drill down into the data based on different criteria or perspectives.
To create metrics from the data, you'll follow the following steps:
On the left-hand side of the Propel Console, click on
"Metrics"to access metrics configuration.Click on the
"New Metric"button to create a new metric.
Give a name and description to your metric, then choose the data pool that contains the data you want to use for your metric.
Then, define the calculation type for your metric based on your requirements. Propel supports various calculation types such as SUM, COUNT, COUNT_DISTINCT, MIN, MAX, AVERAGE, and more.

- Specify the column(s) that you want to include in your metric calculation as dimensions. These columns should be available in the selected data pool.

- Once you have defined all the necessary details, click the
"Create"button to create the metric.
By following these steps, you will successfully create a metric in Propel.
Explore Propel's GraphQL API endpoints
Propel provides several powerful GraphQL API endpoints that enable you to leverage the full potential of your Snowflake data. Let's explore these endpoints in detail and provide examples of how to query them using JS-based GraphQL queries and Postman.
Once you have your Metric defined, you can try Propel’s GraphQL Explorer to query the Metric data and for Postman, you'll need to create a Postman collection for your new Snowflake API. Below, are the steps to do that:
Launch Postman and create a new collection.
Within the collection, create a new request and give it a name like "Snowflake API".
In the "Authorization" section of your collection, click on "Configure new Token" and follow these steps:
a. Choose "OAuth 2.0" as the authentication type.
b. Select "Request headers" to add the auth data.
c. Set the header prefix as "Bearer".
d. Fill in the values for the token:Token name: "{{$isoTimestamp}}"
Grant Type: "Client Credentials"
Access Token URL: "https://auth.us-east-2.propeldata.com/oauth2/token"
Client ID: Use the Client ID from your Propel Application created in the Propel Console.
Client Secret: Use the Client Secret from your Propel Application created in the Propel Console.
Scope: "metric:query"
Client Authentication: "Send as Basic Auth header"
e. Ensure that the "Auto-refresh access token" is enabled.
Enter the endpoint "https://api.us-east-2.propeldata.com/graphql" in the request URL field.
Choose the "POST" method from the dropdown menu.
In the request body, select the "GraphQL" option.
Enter your GraphQL query in the query field.
Provide the necessary variables in the variables field.
Save the request and click on the "Send" button to execute the GraphQL request.
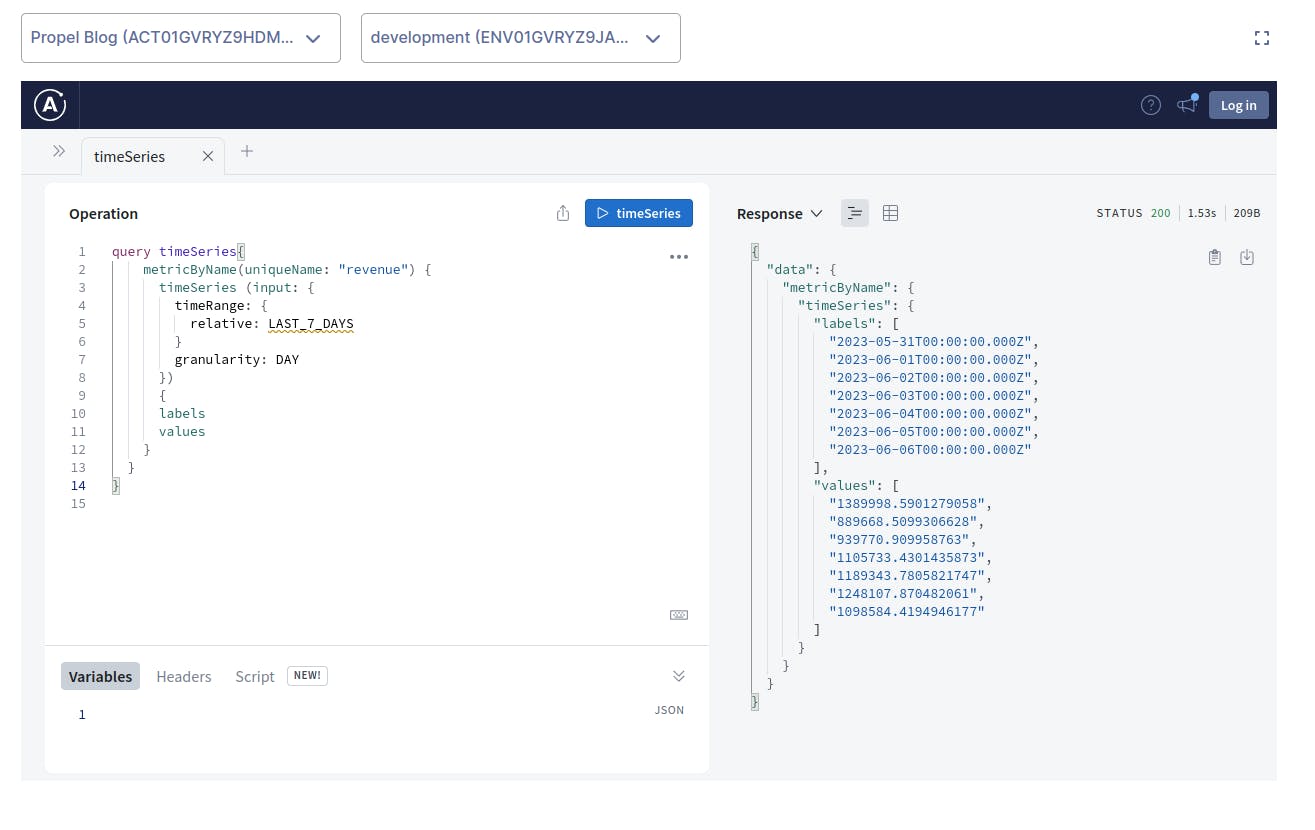
1. Time series API
The Time Series API allows you to analyze and query time-based data. It is particularly useful for tracking and visualizing trends over specific time intervals. By specifying the desired metric and interval, you can retrieve time-series data points. For example, you can query the daily sales trends or hourly website traffic.
Here's an example of how to query the Time Series API using JavaScript-based GraphQL queries.
Paste the following query in Propel’s GraphQL Explorer, then run it.
query timeSeries{
    metricByName(uniqueName: "revenue") {
      timeSeries (input: {
        timeRange: {
          relative: LAST_7_DAYS
        }
        granularity: DAY
      })
      {
      labels
      values
    }
  }
}
After running successfully, you'll be able to see the following output:
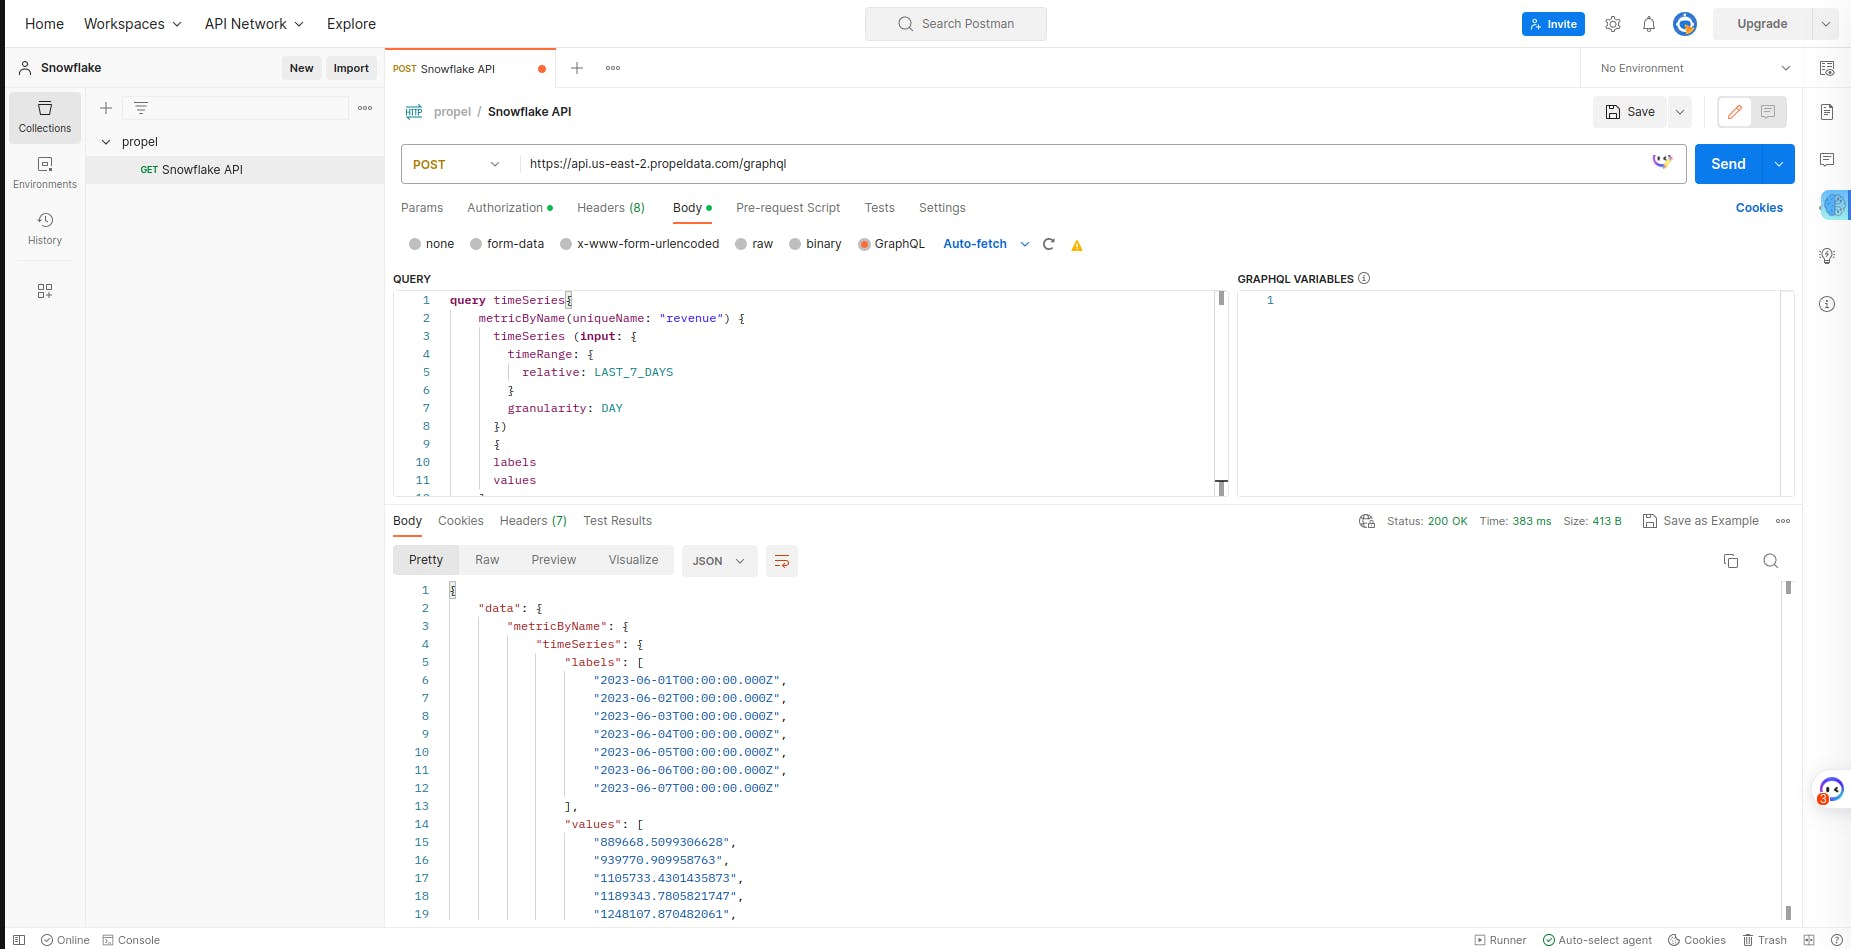
To test the Time Series API using Postman, you can send a POST request to the GraphQL endpoint with the GraphQL query in the request body.
You'll get an output similar to this one:
2. Counters API
The Counters API allows you to retrieve counts of specific events or metrics from your Snowflake data. It is useful for monitoring and tracking various aspects of your data, such as the number of orders, product reviews, or customer registrations. By querying the Counters API, you can gain insights into user behaviour and engagement.
Here's an example of how to query the Counters API using JavaScript-based GraphQL queries:
query counter{
    metricByName(uniqueName: "revenue") {
      counter (input: {
        timeRange: {
          relative: LAST_30_DAYS
        }
        filters: [
          {
          column: "CHANNEL"
          operator: EQUALS
          value: "FACEBOOK"
          }
        ]
      })
      {
      value
    }
  }
}
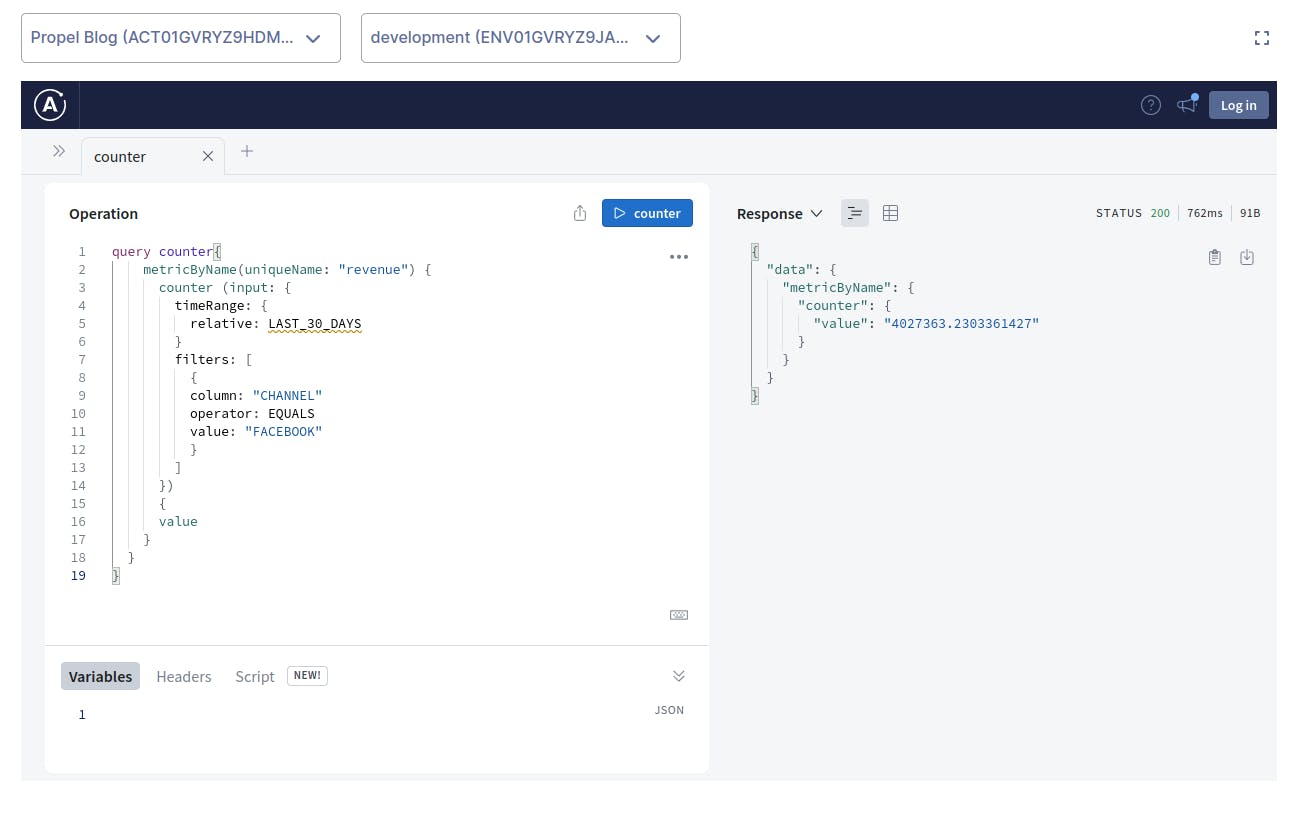
After successfully running the query, you'll see the following output:
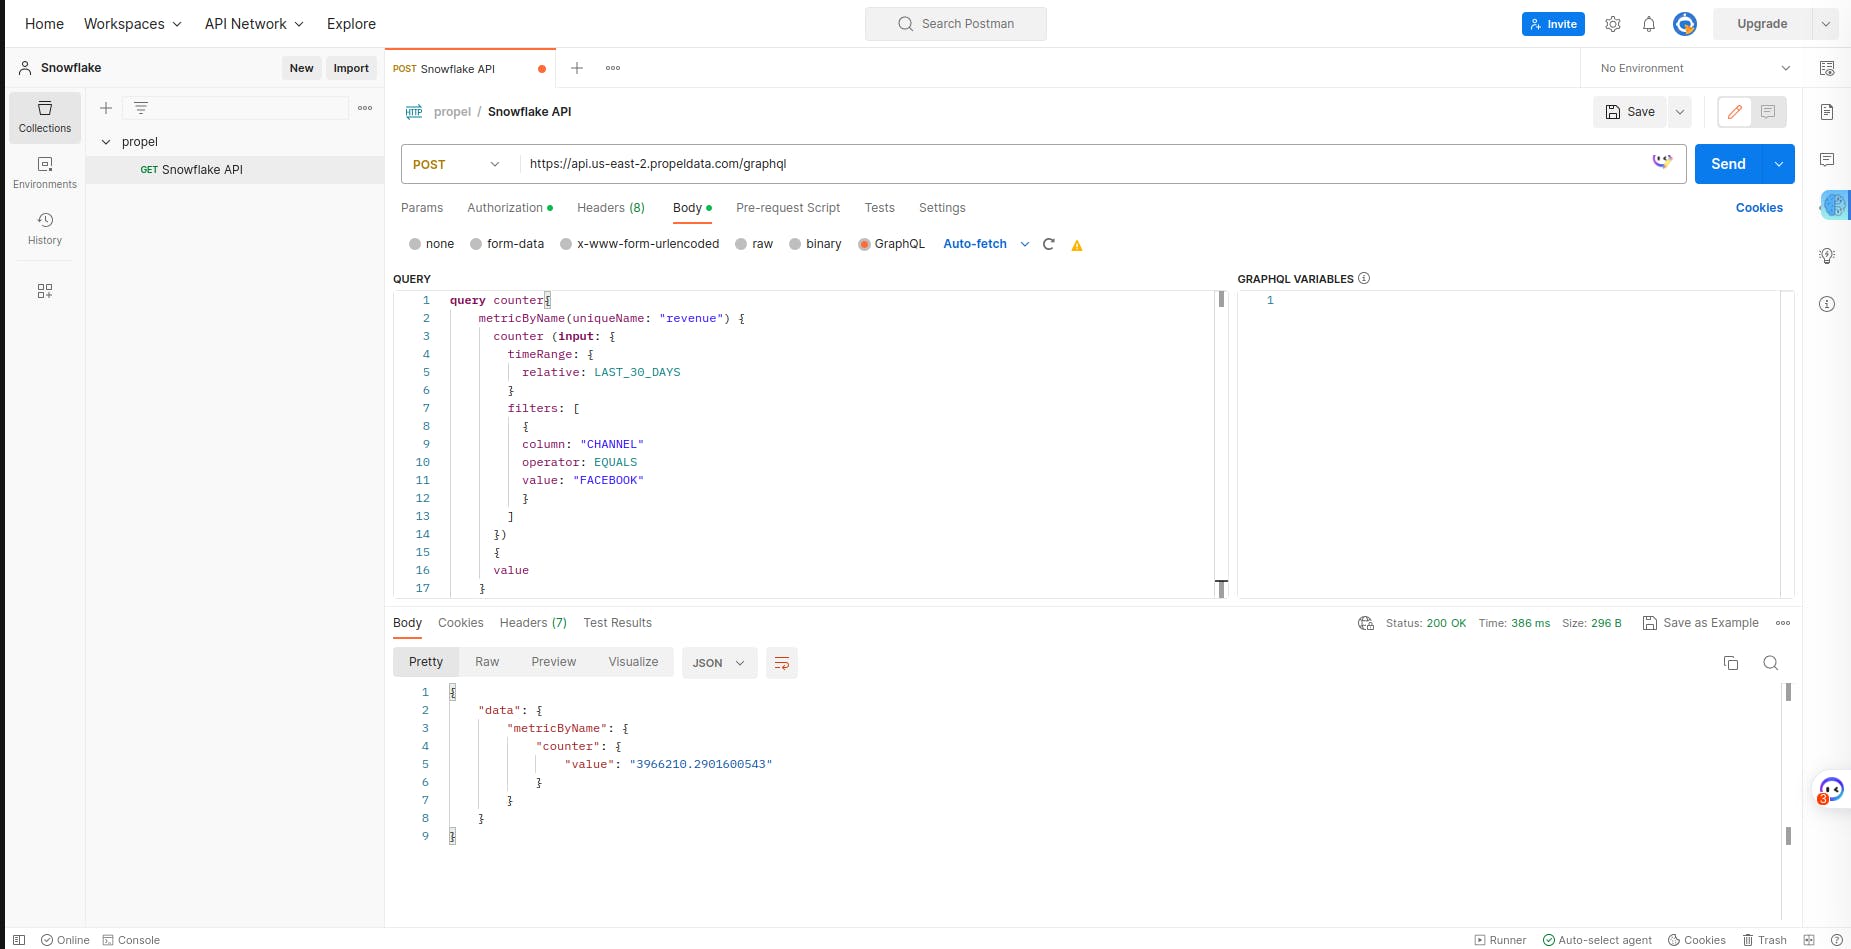
To test the Counters API using Postman, you can send a POST request to the GraphQL endpoint with the GraphQL query in the request body.
You'll get an output similar to this one:
3. Leaderboard API
The Leaderboard API allows you to retrieve leaderboard data based on specific criteria. It is useful for identifying top performers, popular products, or active customers. By querying the Leaderboard API, you can gain insights into rankings and trends.
Here's an example of how to query the Leaderboard API using JavaScript-based GraphQL queries:
query leaderboard{
    metricByName(uniqueName: "revenue") {
      leaderboard (input: {
        timeRange: {
          relative: LAST_7_DAYS
        }
        dimensions: [{
          columnName: "PRODUCT_CATEGORY"
          }]
          rowLimit: 10
          sort: DESC
      })
      {
      headers
      rows
    }
  }
}
After successfully running the query, you'll see the following output:

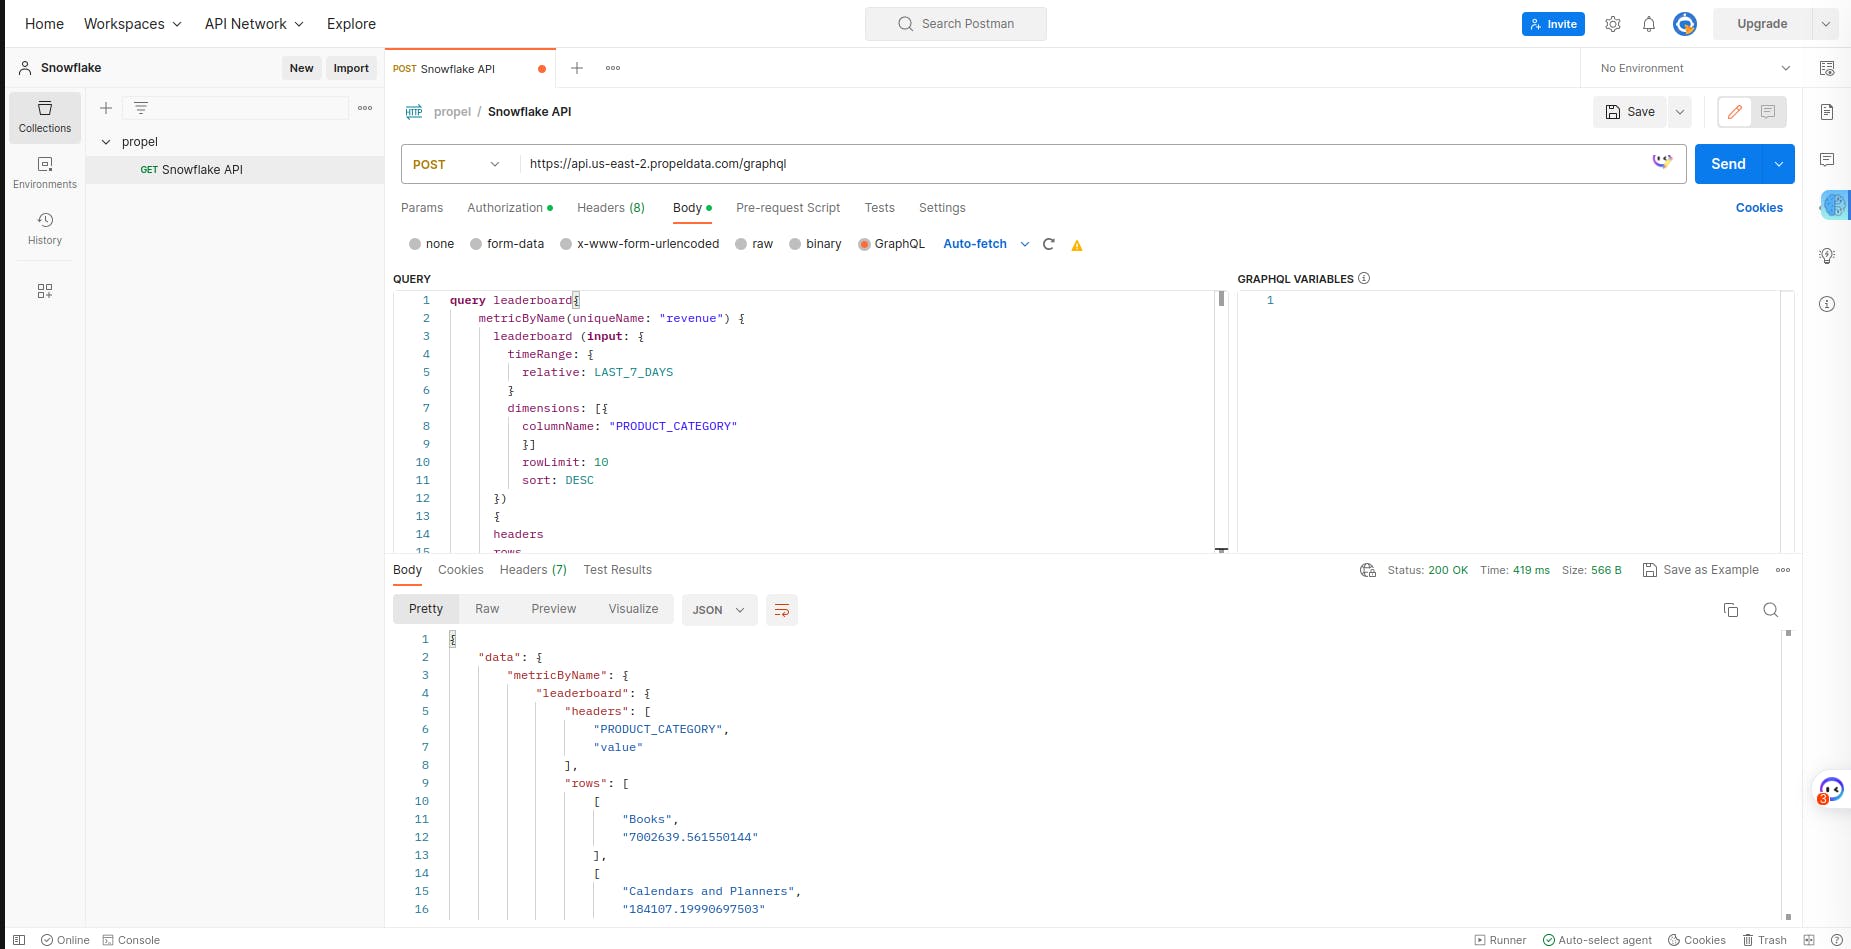
To test the Leaderboard API using Postman, you can send a POST request to the GraphQL endpoint with the GraphQL query in the request body.
You'll get an output similar to this one:
4. Metrics Report API
Propel's Metrics Report API allows you to generate comprehensive reports based on the Metrics defined in your data. It provides aggregated data and insights into key business metrics, empowering data-driven decision-making and performance monitoring.
Here's an example of how to query the Metrics Report API using JavaScript-based GraphQL queries:
query metrics {
  metricReport(input: {
    timeRange: { start: "2022-01-01T00:00:00Z", stop: "2023-02-01T00:00:00Z" }
    dimensions: [
      { columnName: "CHANNEL", displayName: "Channel" }
      { columnName: "PRODUCT_NAME", displayName: "Product Name" }
    ]
    metrics: [
      { uniqueName: "revenue", displayName: "Revenue" }
    ]
  }) {
    headers
    rows
  }
}
After successfully running the query, you'll see the following output:

You can also test the Metrics Report API using tools like Postman. Simply send a POST request to the GraphQL endpoint with the GraphQL query in the request body, and you will receive the metrics report in the response.
Your output should look like this:

Conclusion
In this article, we have discussed the process of exposing Snowflake data with GraphQL APIs using Propel, an all-in-one customer analytics API platform. We have explored the importance of exposing Snowflake data through APIs and the steps to expose Snowflake Data with GraphQL APIs: creating a new Snowflake data source, creating a new Propel Data Pool, creating metrics from the data, then explored how to query these endpoints via Propel’s GraphQL Explorer and through Postman.